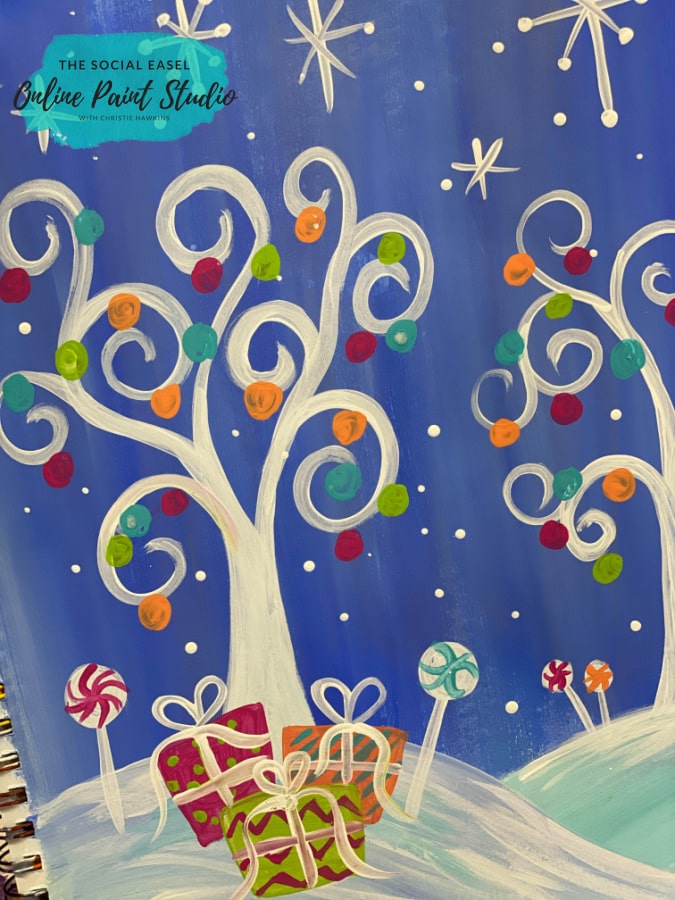
Whimsical Christmas Scene Painting Tutorial for Beginners
It’s never too late for a Christmas activity!! I had to share this super simple and fun whimsical Christmas scene painting tutorial with all of you to create this week.
It’s perfect for beginners and kids, or anyone who has fun taking a quick painting tutorial and making it their own.
* This post may contain affiliate links. If you purchase, I could make a small commission at no charge to you. Please read my Disclaimer and Privacy Policy HERE.
I want this to be fun for you! Painting is a positive place all about enjoyment. It’s just like anything else- You have to jump in. Just get started. The more you do it, the more you will learn, and the more comfortable you will feel.

This whimsical Christmas scene is all about letting loose and just taking in the moment.
Take a look… My brushstrokes are imperfect! Don’t worry about perfection and have fun. While painting this, I dropped a glob of silver paint right in the middle of my background and just wiped it away and blended it in.
When you step back and look at the painting as a whole, you’re not going to notice those small things.
Materials Mentioned
- Mixed Media Pad
- 1″ Flat Brush
- Assorted Round Acrylic Paintbrushes
- Acrylic Paint
I am only using two brushed for this painting. When I taught paint nights, these were the two I always had available for all attendees. You can paint so many things with just a 1″ flat brush and a small round.
Mine is a #2, but every brand sizing is numbered a little differently.
I am painting in my mixed media pad. You can paint on anything! Read more about My 5 Favorite Painting Surfaces HERE.
Mixed media pads are notebooks of heavyweight paper that can handle the paint. They are great for anything from practicing your strokes to painting a full landscape.

When you have the whole page painted, it can warp a little, but after it’s completely dried, all you have to do is place a heavy book on it to flatten it out.
If you love what you created, you can tear the paper’s perforated edge and framed it!
Paint a Simple Winter Background
Begin this painting with a simple background. I want you to pick your favorite blue paints and grab a white to blend.
Your paints don’t have to be the same colors as mine. You can choose anything close for a similar look or do something entirely in your own style and colors.
Load your 1″ flat brush with a mixture of cobalt and white paint and use long vertical strokes on your painting surface to cover.
You don’t have to pull the background all the way to the bottom of your page because we will add snowy hills next.
Don’t be afraid of the paint.
When painting your whimsical winter scene’s background, make sure you have enough paint on your flat brush to prevent dragging and skipping.
If you struggle with blending paint, 9 times out of 10, there isn’t enough paint on the brush. I have a few blogs about blending paint. You can see more blending tips in THIS BLOG.
I want the background to be kinda streaky, so when loading your brush with paint, the colors don’t have to be thoroughly mixed. Watch the video below for an up-close view of how I load my paintbrush.
This is your sky. Streak silver in, make it dark blue… whatever you want!
How to Paint Snowy Hills
For the base of our background, we are going to paint two little snowy hills with a 1″ flat brush. They will be slightly different colors of white tinted with blue.
Don’t make the hills super tall. They only need to be about a quarter of the way up your painting surface to leave space for the whimsical trees and other Christmasy things.

Make one a little higher than the other. Overlapping the hills will make one fall into the background of your wintery scene.
Add a few white highlights at the top of your snowy hills with a little white paint on your round brush and a light feathery hand.
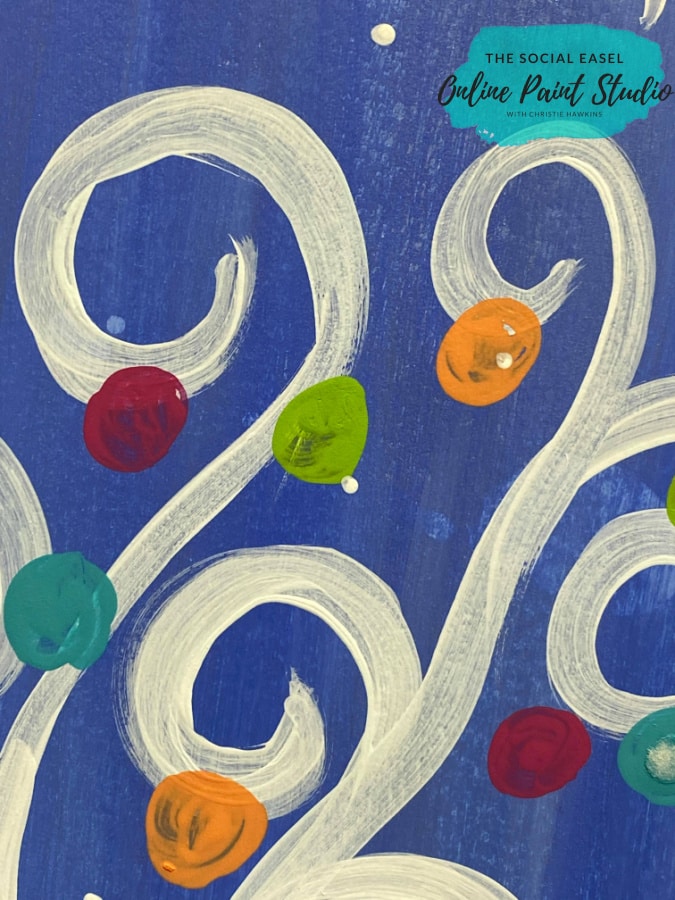
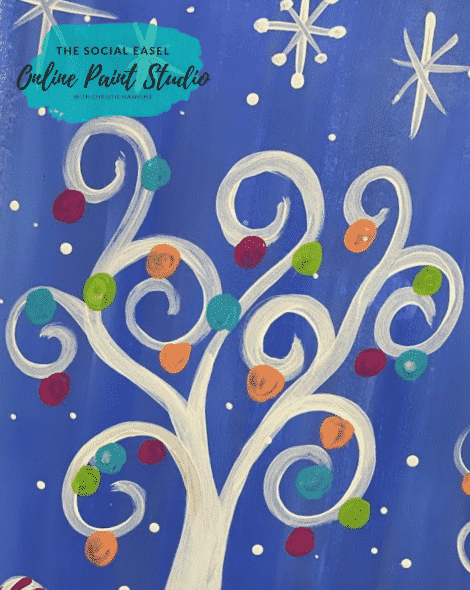
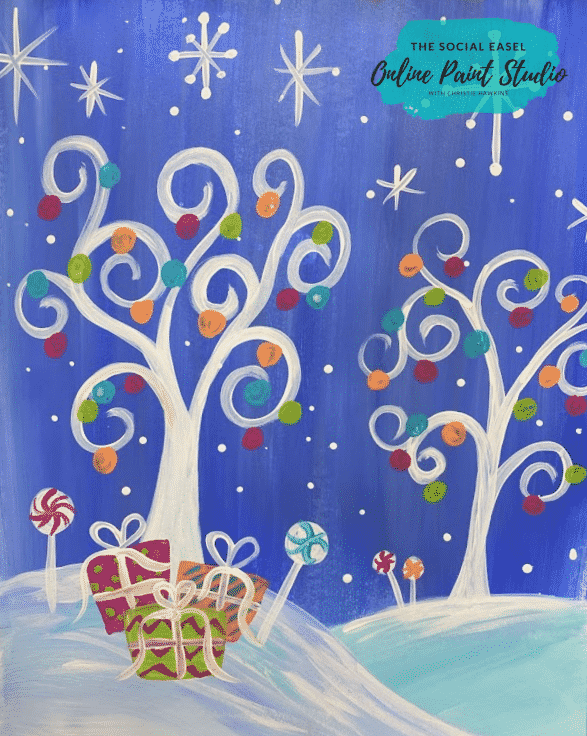
How to Paint Whimsical Curly Q Tree’s
Now it is time to add fun little trees that will have ornaments hanging from them.
Using a small round paintbrush and white paint, start at your tree’s base and pull the brush up and bend into a curl for the branch.
With the same motion, thicken the trunk by painting right beside your first line and curl out in the opposite direction for another branch.
If you don’t like the curly q’s, then make straight branches! Art is all about what you like!
Practice the curls in your mixed media pad to make sure you are applying the right amount of pressure. Remember, the more pressure you use, the thicker your line will be.
One thing I always teach when painting trees is that the branches grow out from the trunk creating a V shape. If they shoot straight out, it will not look right.
Create as many curly branches as you’d like on your trees.
I have one small tree in the background and one larger tree just off-center on the front hill that will be my focal point.
Don’t try to make this look super perfect. I always say Trust the Process because it can look almost ugly for a minute, but as you layer the bits of your painting in, it will all come together.
Just keep moving so you don’t get too fixated on one thing. Then when you have completed your steps, take a step back, and look at the painting as a whole. If there is a part that still bugs you, then you can go back in and paint over the top of it.
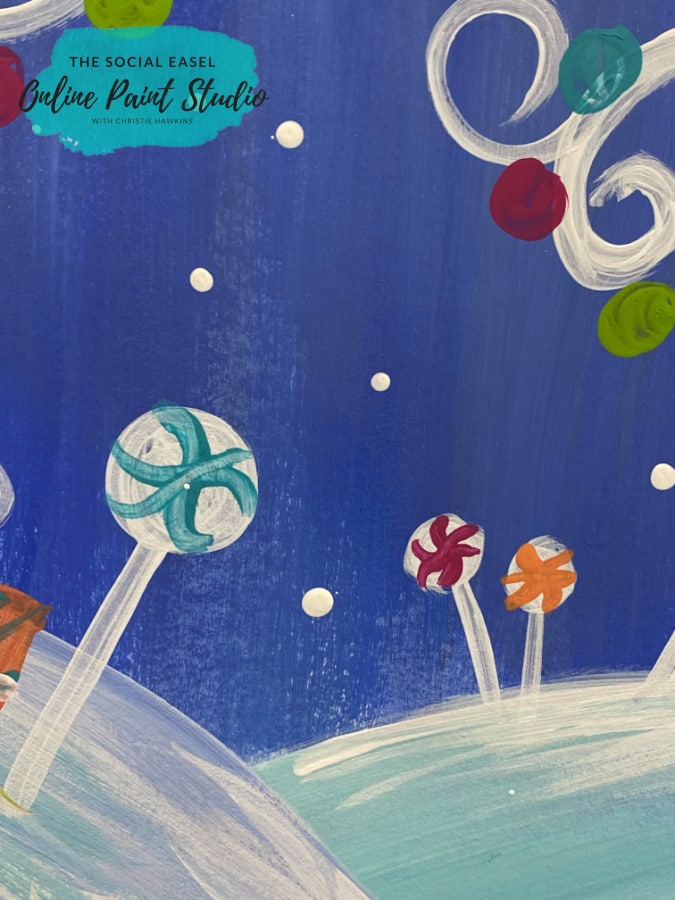
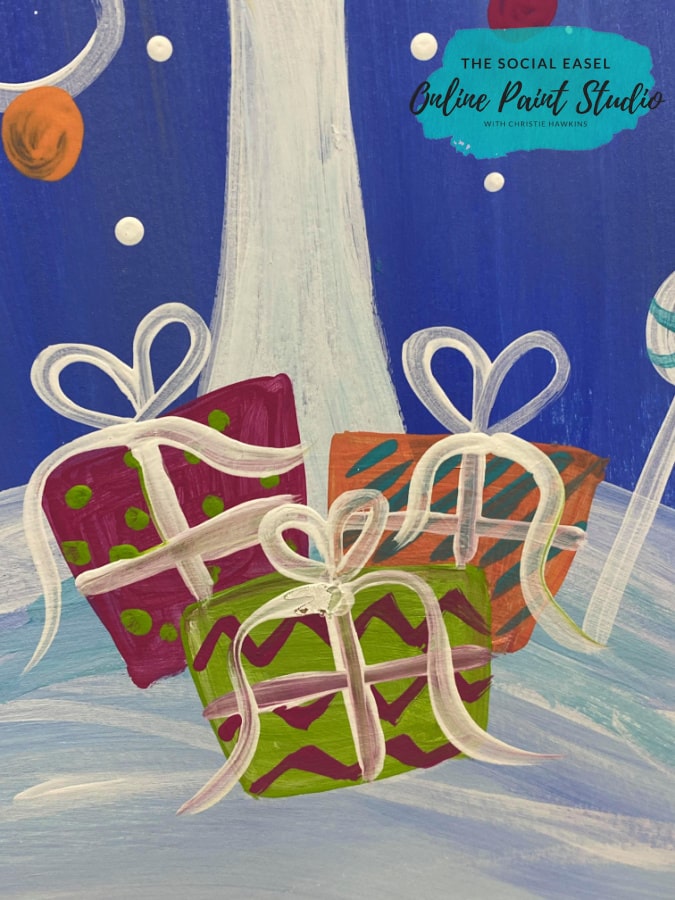
Paint a Base Layer for the Christmas Accents
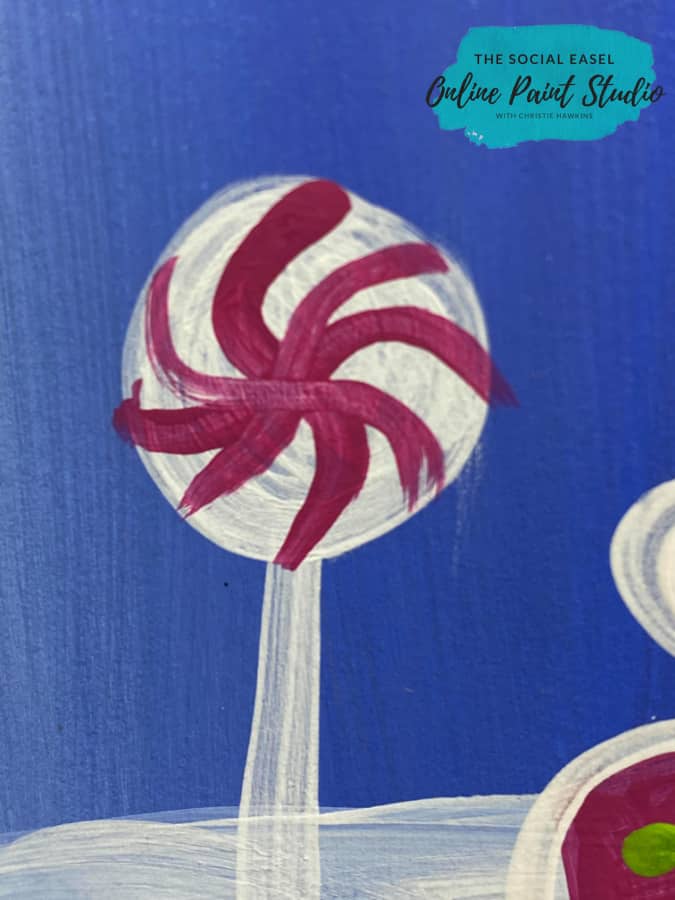
Next, let’s paint a white base for the peppermint sicks and gifts. The white base will make sure the vibrant colors will pop and be true colors.
Using just white paint on your round brush, paint little lollipop shapes growing from the ground around your trees.
Then, paint in the basic square shape of a few gifts.
Mine overlap the tree trunk and aren’t perfect squares. I am going for a whimsical shape to match the painting’s theme, so don’t worry about making them perfect.
Add color!
Now we get to paint little Christmas bulbs on the trees. Using a small round brush, paint circles with your chosen colors. Just jump around and add the bulbs where you want them. Use one color at a time and rinse the brush between to keep the colors true.
I used whimsical colors, but you can choose any of your favorites!
Then add peppermint swirls to your lollipops! Paint 3-4 little S’s that cross in the center.
After that, paint the gifts. Fill them in with a thin coat of color. Once that is dry, decorate with patterns of stripes or polka dots and bows.
How to Paint Snowflakes
The last addition to this whimsical Christmas scene is snowflakes.
First, dip the back of your brush handle into white paint and poke little white dots all around your painting. This is the easiest way to paint snow!
Just keep moving and don’t overthink placement to create an organic snowfall.
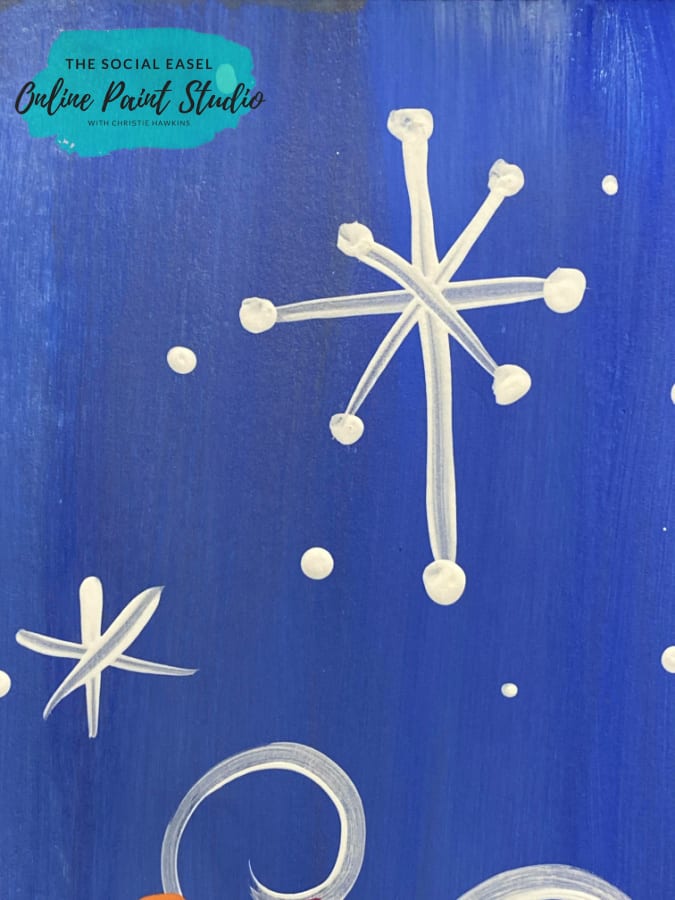
Now, time for those big whimsical snowflakes.
Start with one long vertical line, cross it with a small line, and then cross it again with an X.
All snowflakes are unique! Vary the sizes and make some with two X’s stacked or an Astrix.
Dot the ends of the points on some of your snowflakes for more whimsy.
Watch My Whimsical Christmas Scene Tutorial!
I teach acrylic painting on my Facebook page often! Make sure to follow The Social Easel HERE so you don’t miss a thing.
This easy whimsical Christmas scene painting can be customized in so many ways and is fun for everyone involved! Remember, it’s not about making anything perfect.
I would love to see what you create.